
Weather Station Installation and Siting Guide
Choose the best available location, install each sensor correctly, and validate the readings before you trust them.
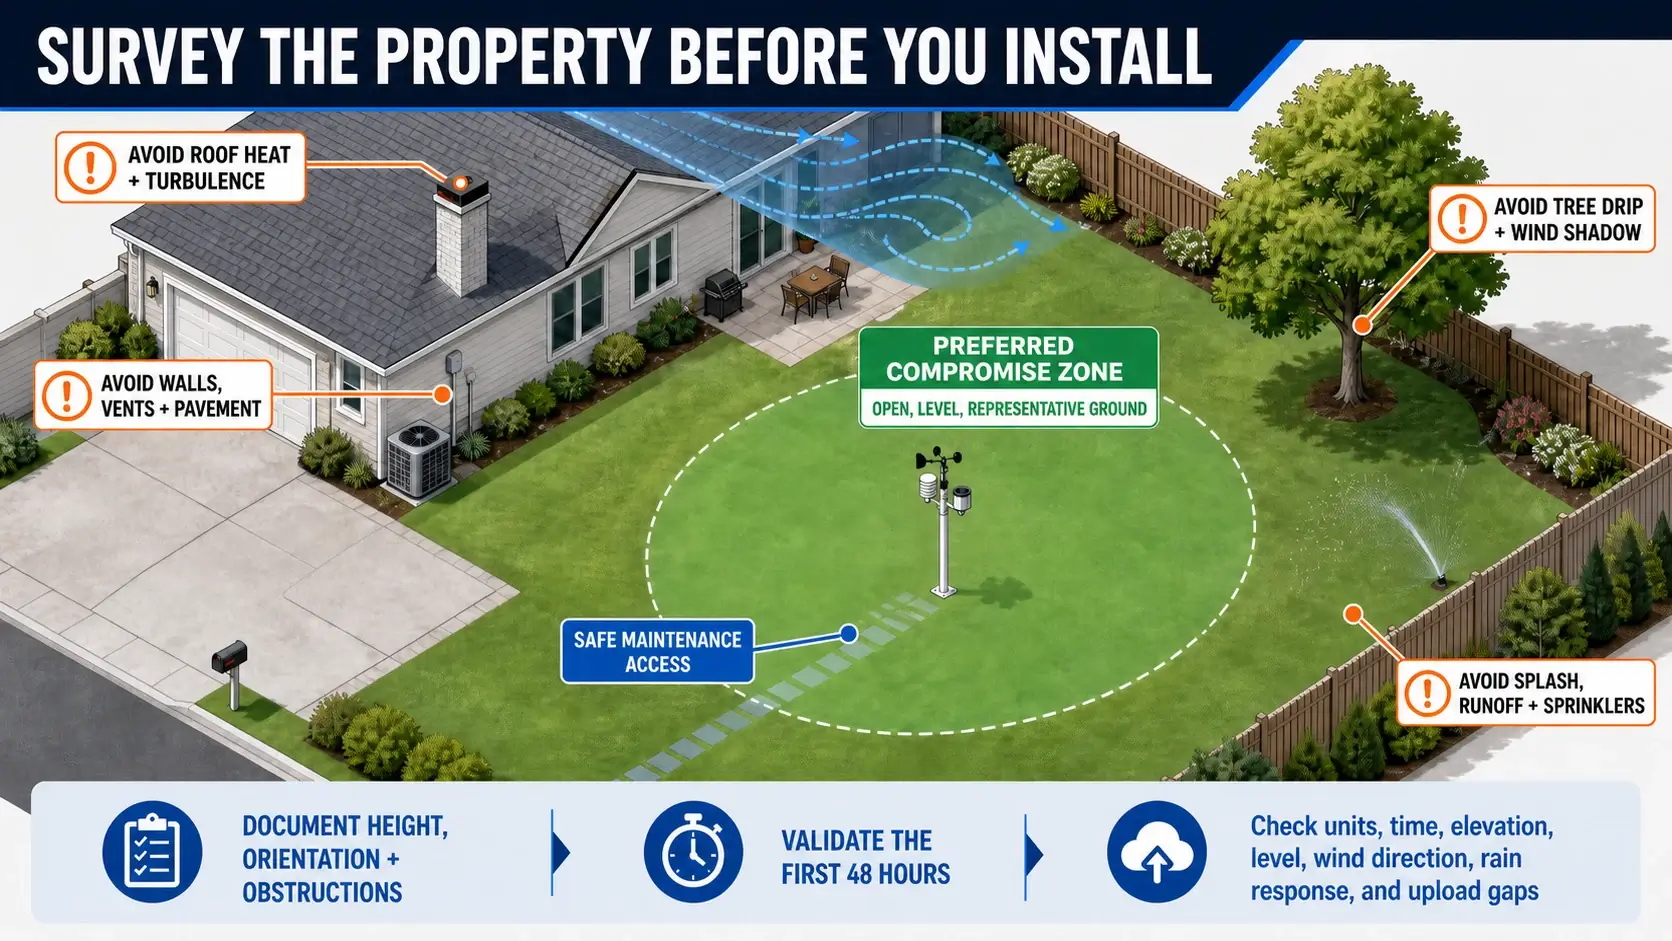
Survey the property before you install
Walk the property with the assembled sensor dimensions, your station manual, and a tape measure. Note roofs, walls, pavement, air-conditioning equipment, chimneys, irrigation, trees, fences, slopes, and future maintenance access. The nearest clear-looking spot is not always the most representative one.
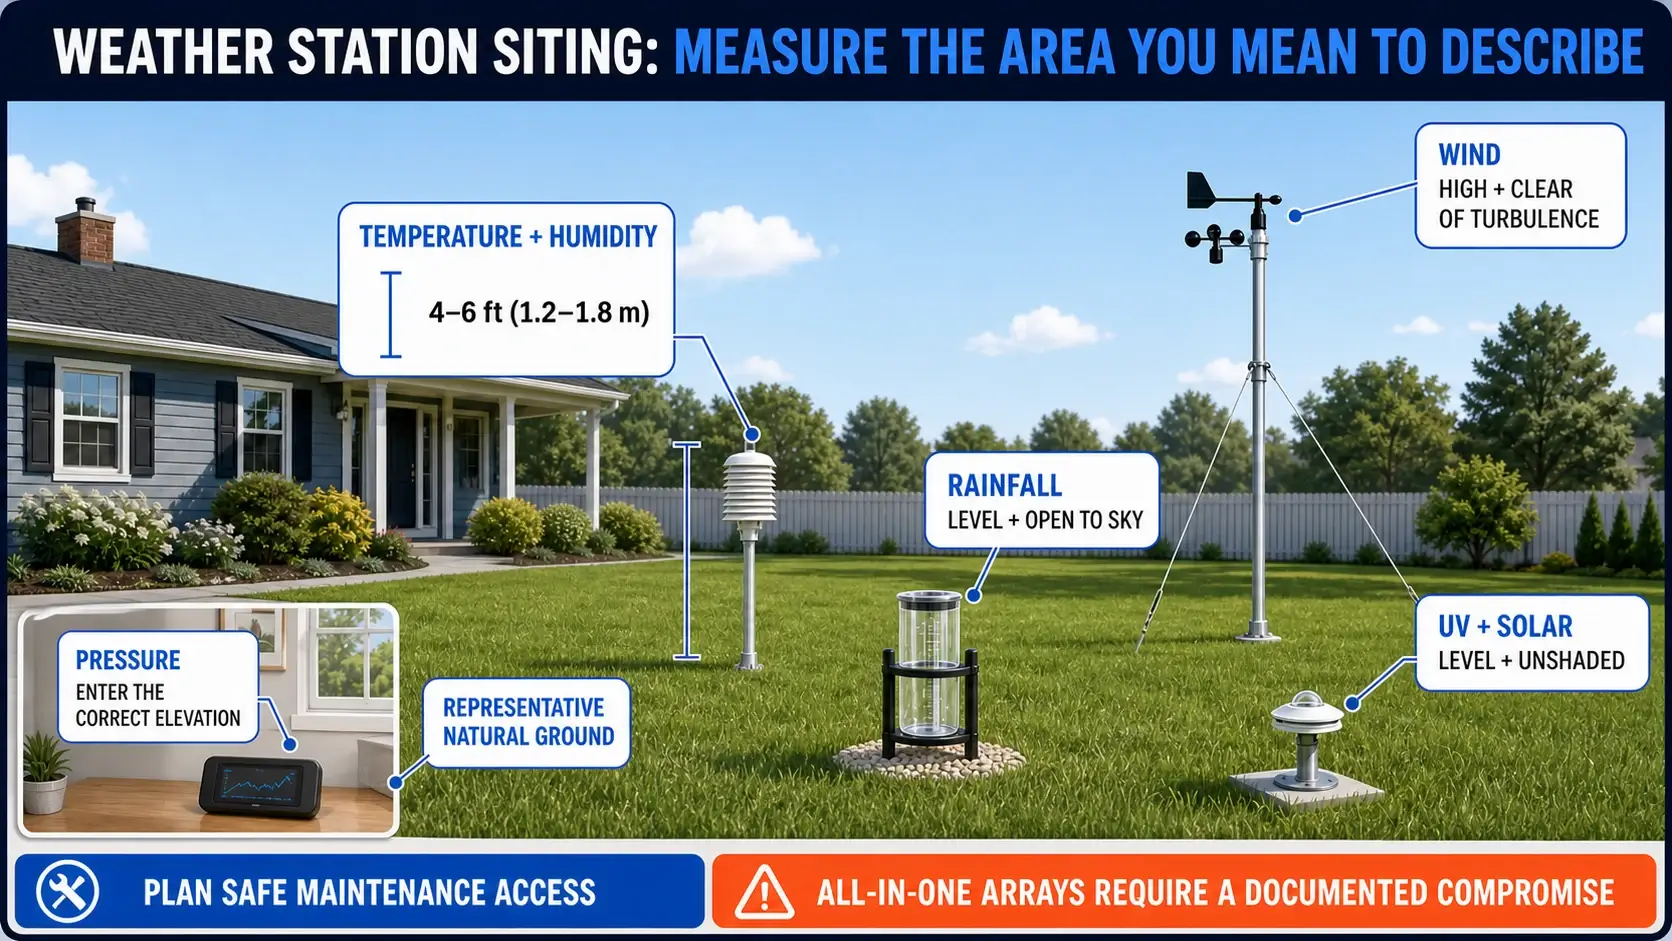
Measure the area you mean to describe
A shaded hollow, irrigated bed, hot patio, or rooftop may accurately describe that microclimate but not the surrounding neighborhood.
Reduce nearby interference
Keep the array clear of surfaces and objects that radiate heat, deflect wind, shed water, drip, splash, or block precipitation.
Plan safe maintenance
You will need to clean the rain funnel and shield, inspect batteries and solar surfaces, level the gauge, and tighten hardware.
Place each sensor for the variable it measures
Professional observing networks can separate sensors and follow a specific exposure standard. Consumer systems often combine them. Use this matrix to understand the competing priorities, then follow your station manual for model-specific limits.
| Measurement | Strong residential starting point | Avoid | Verify after installation |
|---|---|---|---|
| Temperature and humidity | About 4–6 ft (1.2–1.8 m) above representative natural ground, in a ventilated radiation shield. | Roofs, pavement, reflective walls, vents, exhaust, direct heat sources, and unusual wet/dry pockets. | Compare trends with nearby trusted stations, investigate persistent daytime warm bias or nighttime cold pooling. |
| Rainfall | Level, open to the sky, low enough to service, and away from splash, drip, runoff, and wind shadows. | Roof edges, trees, fences close to the rim, sprinklers, and hard surfaces that can splash into the collector. | Confirm the collector is level and the funnel/tipping path is unobstructed. |
| Wind speed and direction | As high and clear of turbulence as is safe and practical. The professional reference height is commonly 10 m (33 ft) in open exposure. | Roof wakes, tree canopies, walls, and mounting poles that block the vane or cups. | Set the direction reference exactly as the manual specifies and confirm free rotation. |
| Pressure | The pressure sensor may be in the console or gateway, enter the correct site elevation and confirm the station’s pressure mode. | Guessing elevation or comparing station pressure with sea-level pressure as if they were the same value. | Compare the same pressure type with a nearby trusted observation during stable weather. |
| UV and solar radiation | Level and unobstructed with the sensing surface clean and oriented as directed. | Shade, tilted installation, dirty lenses, and nearby reflections. | Check that the sensor is level and not shaded through the day. |
Install the station in seven controlled steps
1Inventory and bench-test
Confirm every clamp, U-bolt, cable, battery seal, cup, vane, funnel, mast adapter, console, and gateway part against the manual. Pair the sensors and verify live readings at ground level before climbing or drilling.
2Document the site
Record coordinates, ground elevation, mounting height, surface type, and the direction and approximate height/distance of major obstructions. Take photos so future changes are obvious.
3Build a rigid, plumb support
Match the mast diameter to the station clamps. Anchor the pole, tripod, or bracket for the expected wind load and local conditions. Use corrosion-resistant hardware and safe sealing methods.
4Level what must be level
Level the mast where the array design requires it and check the rain collector in both directions. Recheck after final tightening because clamps can pull an assembly out of level.
5Orient the array and wind reference
Face solar panels, labels, and direction marks exactly as the manufacturer specifies. Some systems require a true-north reference, while others apply an offset in software—do not assume.
6Secure power and communications
Install only approved batteries, seat weather seals correctly, route cables with drip loops where applicable, and verify that the console or gateway has reliable reception and network access.
7Commission before walking away
Check temperature, humidity, pressure, wind direction and speed, rain-gauge response, battery status, timestamp, units, coordinates, elevation, and online uploads. Save the configuration and photos.
✓Need mounting hardware?
Use the weather station mounting ideas guide to match a roof/eave, chimney, fence/wall, or open-yard site with current mounting options.
Common installation mistakes
Installing above a roof or patio
Sun-warmed materials can make daytime temperature readings unrepresentative and create turbulent wind flow.
Forgetting level and splash
A tilted collector, roof runoff, tree drip, or hard-surface splash can create rainfall errors even when the funnel is clean.
Leaving the vane in a wake
A mast, chimney, tree, or roof can slow and redirect airflow. More height helps only when it actually reaches cleaner flow.
Assuming “north” setup
Follow the model’s reference mark and software procedure. A fixed orientation error can make every direction reading wrong by the same amount.
Mounting where you cannot clean
Rain funnels, shields, solar surfaces, batteries, and hardware need periodic access. Unsafe access turns routine care into deferred maintenance.
Applying offsets too soon
Rule out exposure, units, elevation, level, obstruction, and maintenance problems before adding a calibration offset.
Validate the first 48 hours
A believable number is not proof of a good installation. Watch how your station responds through daytime heating, nighttime cooling, changing wind direction, and—if available—a rain event.
- Confirm timestamps, units, coordinates, elevation, and pressure type.
- Compare temperature and humidity trends with two nearby trusted stations, allowing for real microclimate differences.
- Check whether wind speed changes unrealistically when wind comes from a roof, mast, or tree direction.
- Confirm the rain collector remains level and returns to zero after a controlled manufacturer-approved functional check.
- Inspect online uploads for gaps, duplicate stations, or wrong location metadata.
- Save the baseline photos and maintenance date.
If readings look suspicious, use the weather station accuracy troubleshooting guide before changing calibration. For ongoing care, follow the weather station maintenance checklist.
Installation FAQ
What is the best location for a home weather station?
For many all-in-one stations, an open, level, serviceable yard location away from pavement, roofs, walls, vents, irrigation, and trees is the best practical compromise. The exact location depends on which measurements matter most and the requirements in your station manual.
Can I install a weather station on a roof?
You can, but roofs introduce heat, runoff, access, grounding, sealing, and wind-turbulence concerns. A roof may improve wind exposure while making temperature and rainfall less representative. Review the mounting and all-in-one guides before choosing it.
How high should a weather station be?
There is no single ideal height for a combined array. Temperature and humidity are commonly observed around 4–6 feet above representative ground, rainfall is kept level and serviceable, and the professional wind reference is commonly 10 meters in open exposure. A consumer all-in-one array requires a documented compromise.
Should the weather station face north?
Do not use a universal rule. Follow the orientation mark and setup procedure in the model manual. The correct physical reference and any software offset vary by design.
How far should the station be from trees and buildings?
Far enough that the object does not create material shade, heat, drip, blockage, or turbulence for the measurement. Formal standards use measurement-specific height-and-distance rules. For a home array, maximize clearance, document the remaining obstructions, and use the model and network guidance that applies to your purpose.
Sources and further reading
These official and independent references support the sensor-placement, exposure, and installation recommendations in this guide.
Cornell NEWA placement guide — Practical placement guidance for weather-station sensors.
NWS/CWOP personal weather-station siting guide — Official siting recommendations for temperature, rain, and wind measurements.
Weather Underground installation guide — Network guidance for installing a personal weather station.